Throughout recent blog posts, I’ve found myself continually referencing other peoples’ content when it comes to scaffolding of new SPFx projects. I don’t like to do that because they’re not in my normal style. I also don’t like to have to refer to other peoples’ content when I cough have forgotten how to do so myself cough. Time to write my own.
Initial sanity checking
I assume that this isn’t your first rodeo into the SharePoint Framework, therefore you should already have YeoMan installed as part of that. Let’s ensure you have the YeoMan SharePoint generator installed; type this at the PowerShell command prompt:
yo
Did the yo command work as expected? Great! If not, run this command to to check the installation:
yo doctor
If any of those show a red x, resolve the issues in the manner yo suggests; e.g.
√ Global configuration file is valid
√ NODE_PATH matches the npm root
√ Node.js version
√ No .bowerrc file in home directory
√ No .yo-rc.json file in home directory
√ npm version
× yo version

Your yo version is outdated.

Upgrade to the latest version by running:
npm install -g yo@latest
If you didn’t have a SharePoint generator installed simply run the following command:
npm install @microsoft/generator-sharepoint -g
Running the yo command for the final time should work as expected and show your generator has been installed.
yo

# expected output

? 'Allo [userName]! What would you like to do? (Use arrow keys)
  Run a generator
> @microsoft/sharepoint
  ──────────────
  Update your generators
  Install a generator
  Find some help
  Get me out of here!
Create a new Extension project
Create a new SPFx Extension Project.
yo @microsoft/sharepoint
When prompted for options, select/enter the following:
- solution name = console-logging
- Which baseline packages… = *SharePoint Online only (latest)
- Where do you want to place the files? = Use the current folder
- Allow tenant admin the choice to deploy to all sites… = No (unnecessary for this example as we’re not going to deploy it).
- Wil the components require permissions… = No (unnecessary for this simple example).
- Which type of client-side component to create? = Extension
- Which type of client-side extension to create? = Application Customizer
- What is your Application Customizer name? = [extensionName]
- What is your Application Customizer description? = [enter a description]
Yeoman will go ahead and scaffold your project.
Once completed, open the ./src/extensions/[extensionName]/[extensionName]ApplicationCustomizer.ts file, you should see the following boiler plate code:
// [extensionName]ApplicationCustomizer.ts

import { override } from '@microsoft/decorators';
import { Log } from '@microsoft/sp-core-library';
import {
  BaseApplicationCustomizer
} from '@microsoft/sp-application-base';
import { Dialog } from '@microsoft/sp-dialog';

import * as strings from '[extensionName]ApplicationCustomizerStrings';

const LOG_SOURCE: string = '[extensionName]ApplicationCustomizer';

/**
 * If your command set uses the ClientSideComponentProperties JSON input,
 * it will be deserialized into the BaseExtension.properties object.
 * You can define an interface to describe it.
 */
export interface I[extensionName]ApplicationCustomizerProperties {
  // This is an example; replace with your own property
  testMessage: string;
}

/** A Custom Action which can be run during execution of a Client Side Application */
export default class [extensionName]ApplicationCustomizerCustomizer
  extends BaseApplicationCustomizer<I[extensionName]ApplicationCustomizerProperties> {

  @override
  public onInit(): Promise<void> {
    Log.info(LOG_SOURCE, `Initialized ${strings.Title}`);

    let message: string = this.properties.testMessage;
    if (!message) {
      message = '(No properties were provided.)';
    }

    Dialog.alert(`Hello from ${strings.Title}:\n\n${message}`);

    return Promise.resolve();
  }
}
Run the following command at the prompt:
gulp serve --nobrowser
Your project will build, and all going well you’ll receive the following:
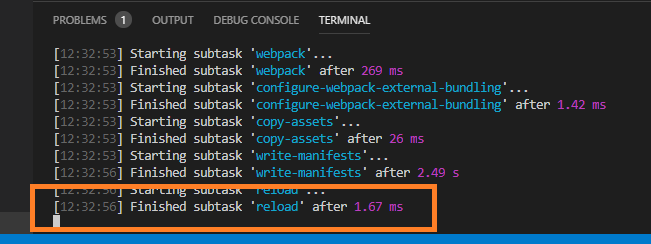
It’s now time to test the scaffolded extension.
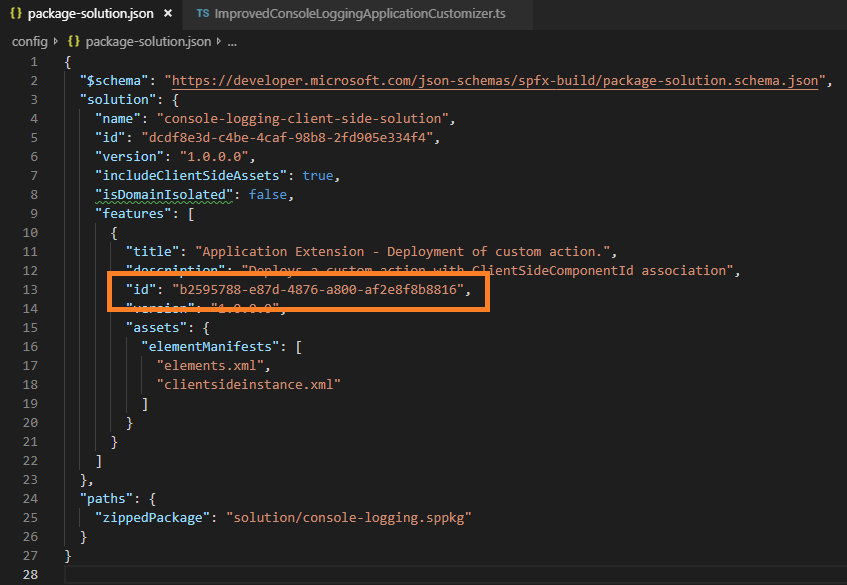
Open your package-solution.json file within the ./config/ folder. Retrieve the id GUID for the component you’ve just scaffolded as indicated here:
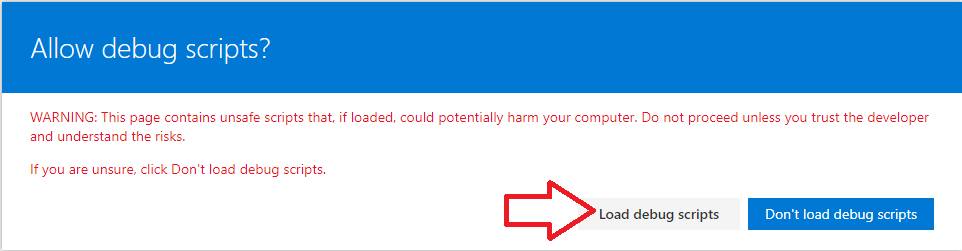
Open your browser, navigate to a SharePoint site, and modify the URL as follows:
https://[**tenantName**].sharepoint.com/sites/[**siteName**]loadSPFX=true&debugManifestsFile=https://localhost:4321/temp/manifests.js&customActions={"[**GUID from package-solution.json**]":{"location":"ClientSideExtension.ApplicationCustomizer","properties":{"testMessage":"Hello World"}}}
Press enter, you’ll receive the following, click Load debug scripts
Finally, the site will load and you should have received the following alert on the page:
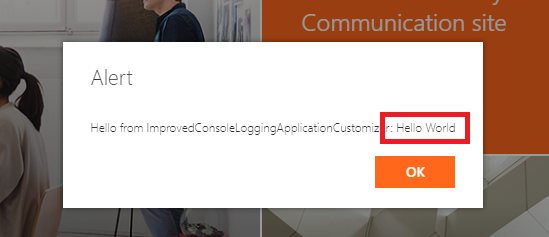
You’ll have no doubt noticed that the properties defined in the URL query string above have flowed through to the properties within the extension.
Gotten this far? … yay you, you’re ready to continue building your lovely new SPFx Extension!