When we left off last time, we’d just finished up configuring a DevOps CI Pipeline and (hopefully) run a successful build which published a package to our Azure Artifact Feed that’s going to act as our npm Registry override. Today we’re going to cover actually using that package our SPFx project.
Here are links to all of the posts in this series:
- SPFx projects and Shared Libraries - numero uno
- Why? - SPFx projects and Shared Libraries - part deux
- The build - SPFx projects and Shared Libraries - iii
- CI Pipeline and npm package - SPFx projects and Shared Libraries - May the 4th be with you ;)
- Consuming the package - SPFx projects and Shared Libraries - 5th and final, I promise…
While we’re on that topic, this has been a much longer series of posts than I’d thought. Do I waffle too much? Let me know in the comments section below :)
I’ve made many assumptions already, I’m about to make some more, hopefully one or more are true:
- You know how to create an SPFx WebPart project.
- You already have an SPFx WebPart project.
If neither of those are true, I suggest that you follow this SPFx tutorial before continuing
What this post will cover
- installing the bundled project.
- using the bundled project.
- final thoughts and an overview of what we’ve achieved.
Installing the bundled package
Let’s get started.
Hopefully you’ve not yet forgotten the details I told you not to forget… but if you have, let’s quickly rehash.
Navigate to Azure DevOps -> Artifacts
If you only have one Artifact feed it’ll be pre-selected and you can continue. If not, select the feed we created previously.
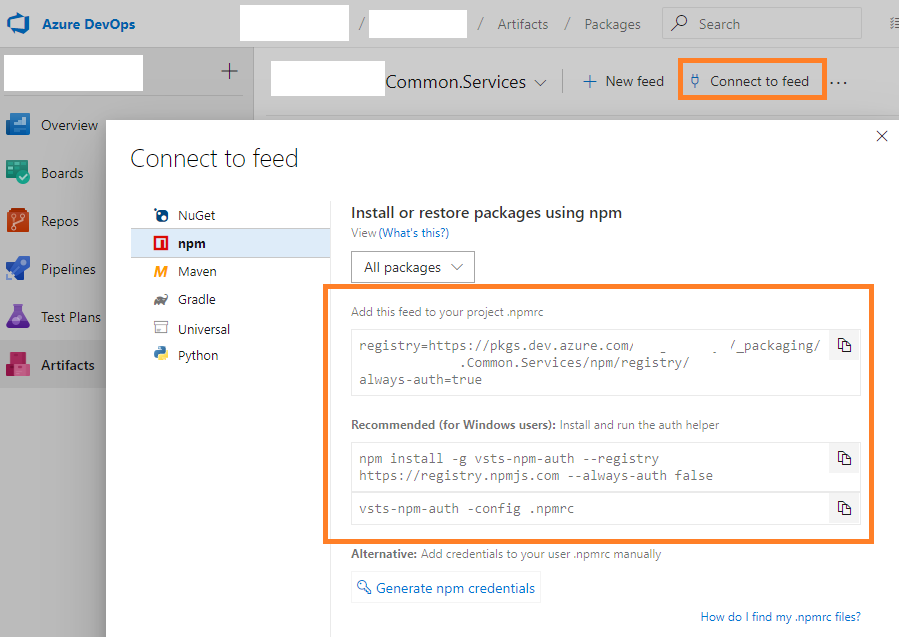
Click the Connect to feed button as indicated, and click npm.
Make notes of the name of the feed and configuration details here so you don’t need to come back later :)
Make notes of all of the details contained therein (again), or simply leave the page open.
Now we’re going to open up our project that we’re going to consume the package within.
Add a new file called .npmrc to the root of the project. Paste the text from the Add this feed to your project .npmrc section, e.g:
registry=https://[tenantName].pkgs.visualstudio.com/_packaging/Common.Services/npm/registry/
always-auth=true
Next up, we need to authorise your system to be able to use Azure DevOps (vsts) as an npm Registry replacement. Open up your favourite terminal (I’m using PowerShell within Visual Studio Code) and enter the following two commands in order:
# install vsts-npm-auth globally
npm install -g vsts-npm-auth --registry https://registry.npmjs.com --always-auth false

# run vsts-npm-auth and set the config to your projects' .npmrc file
vsts-npm-auth -config .npmrc
We’re now ready to install your package within your consuming project.
Return to the Overview of your package within the Artifact feed, and then make a note of the “Get this package” command.
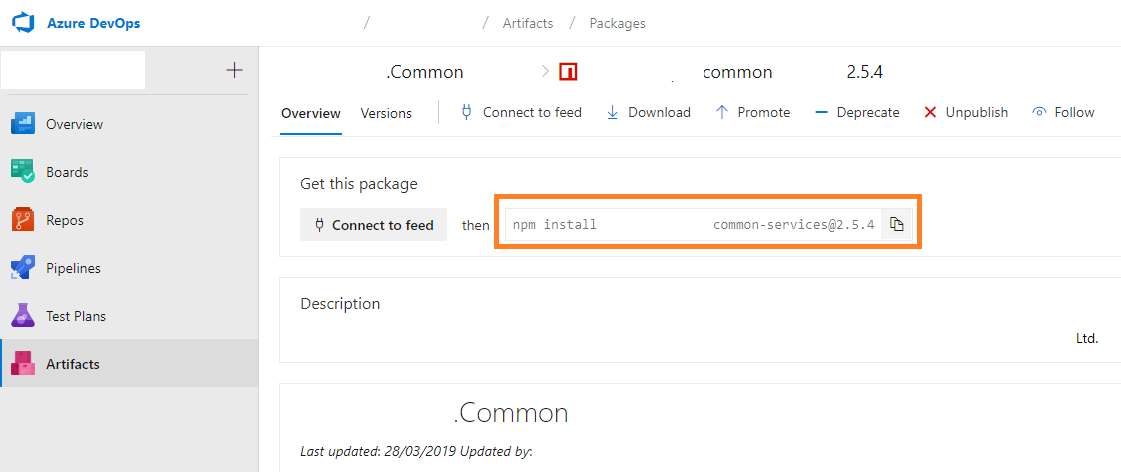
Now, go back to your terminal and run the following command (per your configuration):
npm install tld-domain-mycoolspfxutilitylibrary@latest
All going well, you’ve now installed your published artifact as an npm package within your consuming project. Yippee!!!
Using the bundled project
Now it’s time to actually consume your package within your project, so let’s get to it.
Open up your main .ts file for the WebPart, and add the following import:
# note the path, it might be different for your project
import { StringHelper } from "tld-domain-mycoolspfxutilitylibrary/lib/CustomUtilities";
Now, go to your render() method and do something similar to this:
public render(): void {
  const stringToTruncate: string = "Peter Piper picked a peck of pickled peppers";
  const charactersToTruncateTo: number = 10;
  const truncatedString: string = `${StringHelper.truncateStringToDefinedLength(stringToTruncate, charactersToTruncateTo)}`;

  console.log(`Invoking truncateStringToDefinedLength from my own npm package:\r\n\tstringToTruncate: ${stringToTruncate}\r\n\tcharactersToTruncateTo: ${charactersToTruncateTo}\r\n\ttruncatedString: ${truncatedString}\r\n\ttruncatedString.length: ${truncatedString.length}`);
}
Now run your WebPart in your Workbench and open up your console to (hopefully) view the output from your new fandangled library package that you built and hosted on Azure DevOps as an npm Registry!
Invoking truncateStringToDefinedLength from my own npm package:
  stringToTruncate: Peter Piper picked a peck of pickled peppers
  charactersToTruncateTo: 10
  truncatedString: Peter Pipe
  truncatedString.length: 10
Pretty cool huh? (not the string output, I mean the Library package being consumed by SPFx).
Final thoughts and an overview of what we’ve achieved
Forget for a second how long this series of posts has been, and that we’ve done something extremely simple in a very convoluted manner.
I’ve highlighted here how to create a TypeScript Library project, persist it to Azure DevOps Pipelines, build and bundle it using Continuous Integration, and publish it to an Azure DevOps Artifact Feed, which is then used as an npm Registry replacement.
The example class was merely for string truncation which in itself is pretty benign, but consider the scenario where you’ve got a large amount of List, Library, Search and Term Store manipulation code that you need to share between multiple projects.
That scenario is where this particular solution really shines.
OK, so what? Can’t we now create Library components directly within SPFx?
Well yeah, but like us, you may not want to be constrained by:
Or…
- This feature is currently in preview and is subject to change. It is not currently supported for use in production environments. Your feedback and input around this capability is welcome using the SharePoint Dev Docs issue list.
- You can only host one library component version at the time in a tenant.
- It is not supported to have other component types included in a solution which contains library component.
- You will need to reference library component type during development time from a package manager or using npm link to be able to bundle solutions which are dependent on it.
A single npm install coupled with an automated build, bundle and publishing process makes the post initial complex setup consumption of the project extremely simple.
As alluded to in earlier posts, we needed a production ready solution that is extensible and compatible with any other libraries we choose to build in this way, and what I’ve highlighted here certainly fits that bill.
If you’ve made it this far, thank you.
Please feel free to point out any errors or omissions you may have noticed :)
Final Notes
- Every project you’re consuming your package within requires a .npmrc file, but you only need to follow the auth helper process once per dev box/machine every 90 days.